How to Create a Custom Filter in ConceptDraw PROJECT for Windows
If you need to filter your project data in some special way to get the appropriate information, use an advanced tool for custom filtering.
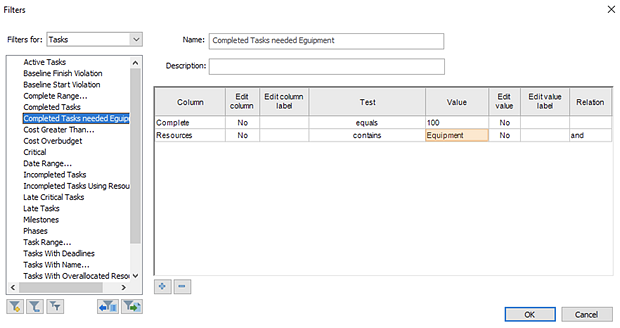
Use the Filters dialog that can be accessed from Edit Filter button in the Filters section on the View tab.
In the left part of the window, you can specify the project view, which is filtered by default. There is also the filters list which contains predefined and user-created filtering options.
- On the View tab, in the Filters section, click the arrow next to Filter to open Filters dialog.
- Select Projects, Tasks or Resources (depending on which type of filter you want to create) and then click the Add Filter
 button. button.
- In the field Column, choose which column you want to filter.
- In the Test field, indicate how you want to match what you chose for the field Column to the Value field in the next step.
- In the Value column, choose the value you need.

- To add another row to your filter, click the Add
 button. button.
- You can set the relationship between rows by selecting a value in the field Relation.
- When you’re done, click OK.

Result: With ConceptDraw PROJECT, you can filter project data so that you only see the information that’s most important to you.
|
How it works:
- An extensive variety of reports on project and task statuses
- Centralizes project information via embedded documents and hyperlinks
- Managing multiple projects from a single file
- Powerful integration with other ConceptDraw products
Useful Solution and Products:
- Quickly start a project
- Plan and execute projects efficiently
- Visualize different phases of the project using diagrams
- Import and export MS Project® files
- Share your project data with MS Project®, Merlin® and OmniPlan® users
- Report project status as a mind map
- ConceptDraw MINDMAP
Process, Brainstorming & Thought Organization
- ConceptDraw PROJECT
Project & Resource Management
- ConceptDraw DIAGRAM
Business Diagramming & Illustration
|

 Edit Project File
  button.
 button.